
I would love to keep sharing my projects with all of you. If you enjoy with my designs, I invite you to become a patron, you will get early access to my designs and exclusive content! Also, you can help with a small donation.
Every day we generate tons of waste, we throw away things that can be really useful in the right context. Starting from that point, I’ve tried to combine the potential of 3D printing with one of the most common types of waste: food and beverage cans. The result of this idea is available for everyone, the Campbell Planter.
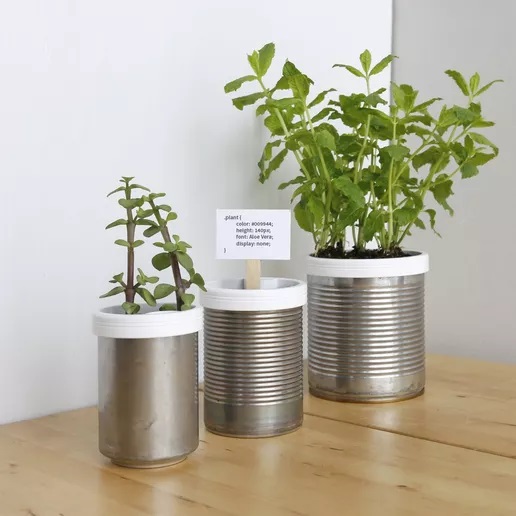
Living or working in a small place usually means the area is not plant-friendly. They require some water, attention and they can get your workspace dirty. Focused on this problems, this 3D printed adapter is a material saving way to give a new life to any type of can and make use of their functionalty and neat design. Here are some of the key aspects of this project:
Material optimization. One part adapter designed to be 3D printed. No support material is needed, smooth surface and material saving (25g of filament for the regular soda can adapter).
Low cost and Availability. Cans can be found everywhere and for a reasonable price (free if you look on the trash bin).
Environmentally friendly. Reuse instead of recycle. Planter suitable for offices and small appartments (it can be near wires or electronic devices with no danger).
Resizable. The design can be scaled to fit any can size. The source files are available to modify any aspect of the design.
Materials needed:
1x Campbell Planter adapter
1x Can or cylindrical container (free on the trash bin)
1x Any plant or seed you have or want
3D printing settings
For the smallest planter I used the regular european 330ml can, although, as you will see on other images, I also used two more can sizes.
I cut the top part of the can to easily insert the 3D printed adapter. I used regular scissors to get a clean and regular cut. Important: be careful because after cutting the can, the edges may be sharp.
Depending on the type of can, you may want to sand it in order to get back the shiny and industrial surface. Based on my experience, you can use any kind of sanding paper, it will take 3-5 minutes to remove all the paint.
Note: if in your country you have a different can size, please let me know in a comment and I will create the adapter in the that size and it will be added to the different size collection.
The adapter is optimized to be 3D printed. No suport material is needed (there’s a roof, but it doesn’t require support and it’s not visible when the plant is inserted). The wall thickness is 0.8mm, and printed with 0.10-0.15mm layer height is enough to make it watertight.
The adapter is available in three different sizes, all based on the dimensions of the cans I already had. There are many different sizes, you can resize the STL file or edit the source files (available in IGES and STEP format).
Consider that the adapter size is 64x90mm. The 64mm measure is the inner diameter of the can (I recommend it to be 2mm smaller than the actual can inner diameter) and the 90mm measure is the can’s height (it can be a little bit larger).
Once the plant is on it’s new house, water it through the hole on the size. You can also remove the adapter and pour some water on the can (it may be easier if it’s a leafy plant). Water should reach the middle point between the two layers of holes. It must cover the first ones but it shouldn’t reach the second ones.
Credits:
flowalistik
Download 3D models
| File | File size |
|---|---|
 campbell-planter-fully-3d-printed-self-watering-planter
|
2 MB |