
Guys, by making this instruction I’ve understood that this thing is quite complicated. It requires some additional things like threaded inserts, bolts, soldering iron etc. I don’t want to disappoint those who wanted to make some easy thing. It is not the one of easy things. But I love it once I got finished it, so, I think it worth to try.
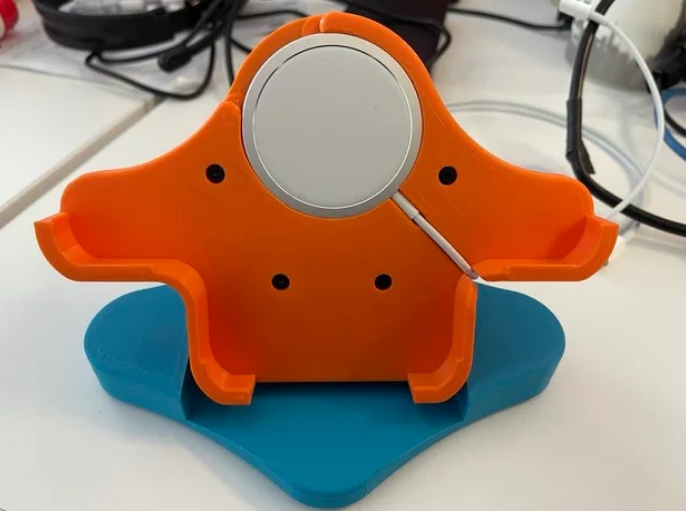
This is a phone holder which ideally fits to iPhone 12 pro max in the case. But this doesn’t mean that you cannot use it with other phones. E.g. iPhone 11 and XR are also ok and can be charged. It allows you to use magsafe charger.
The best thing abut it as you can change the tilt angle of your phone. It has 4 position for 72, 63, 54 and 45 degrees to your table.
To change the tilt angle you need to pull moving part from right to left to release holding teeth, then change the angle, after just stop pulling angle the springs will return the teeth to the closed position.
Print Settings
Printer brand: Creality
Printer: Ender 3 Pro
Rafts: No
Supports: No
Infill: 20%
Filament brand: Any you like
Filament color: Multiple
Filament material: PLA, ABS, PET-G
Notes:
Check print shell settings.jpg for shell settings of your print.
In general, this should be:
20% infill
2mm side walls
1mm top/bottom walls
0.2mm layer
0.4mm nozzle
But you can set it it up on your own – that was just mine settings.
Post-Printing
Assembling
To assemble it you also need:
About 15 M3x10mm screws
About 10 M3x3x4mm treaded inserts
1 blind threaded insert to connect threaded tube
2 springs. They have to be about 25mm length in the expanded state. Diameter can be differ – from 5mm to 10 will be ok.
2 washers 4×12 mm or up to 4×15 mm
4 10mm fisheye gums for furniture for avoiding slippering it on the table
For those who don’t want to use it with magsafe – 11 round magnets with 10mm diameter. The height can be different but not bigger than 4mm
The best set for me is:
Printed and assembled this holder.
Apple magsafe charger
USB type-c extender
Apple 20W charger
That allows me to charge my phone when I need it. If I don’t want to charge I just disconnect female part of usb extender from the magsafe which is fixed in the holder. You can also change tilt angle during charging your phone.
If you don’t want to use magsafe charger you can print magsafe replacement and glue magnets inside with thermal glue (or any other types of glue you prefer).
All part names in the instructions are the same as print parts name.
First of all, assemble hinges. As static parts are the same you can connect any static with any moving parts. To assemble each hinge, you need to:
Insert 1 blind threaded insert inside the moving hinge. To do it I’ve warmed it with the soldering iron and fuse it in.
Take a 5mm drill and expand the hole in the static part of the hinge. That will make M3 blind threaded insert ideally fitting to the static hinge. That will make lyft inside the hinge minimalized.
Put small amount of the silicon oil inside the moving hinge.
Put static hinge inside moving one in the way when teeth are connected with maximum crossing.
Take 1 washer and put it on the M3 screw then put small amount of a thread lock on it.
Take a spring and put it on the m3 screw.
Then screw it inside the blind thread insert of the moving hinge from the hole of static hinge. That should connect hinges into one springing locking hinge. Rotate screw until you reach desired resistance of the spring inside the hinge.
The first hinge is assembled. Repeat these actions to assemble the second hinge.
Now you need to fuse in threaded inserts inside the moving connector. It has visible and invisible sides (invisible is fully connected with the phone holder). All threaded inserts are inserted from the invisible part.
Take last blind threaded insert and fuse it in to the middle hole opposite to the place for the threaded tube (printing part). Remove extra plastic from the visible side of the moving connector after it cools down.
Take a phone holder and put it together with the moving connector to understand which holes of the moving connector are for connecting it with phone holder. Then take 4 threaded inserts and fuse them in these holes at right angles.
Now you need to fuse in remained 4 threaded inserts which are needed to connect hinges to the moving connector. Please consider that these threaded inserts won’t be fused in at right angles.
These 4 threaded inserts should take 4 last empty holes from the invisible side of the moving connector.
Try to understand at what angle you should to fuse it in by looking along the hole. Don’t worry if you miss the angle a bit as you can fix it in a following way. Try to put a screw inside once threaded insert is fused in and cooled down. If you notice that screw is placed at a wrong angle then warm it a bit to make plastic around threaded insert soft. The put the bit into the screw (I’m using allen bolts and it allows me to manipulate it with a bit easily) and push it to put it at the needed angle while plastic is soft. Then keep it in this position until it cools down a bit.
Do it for remained 3 holes and threaded inserts.
The moving connector is prepared for assembling.
My congratulations – the most boring part is done 😊 (excluding the magsafe replacement – making it also quite boring)
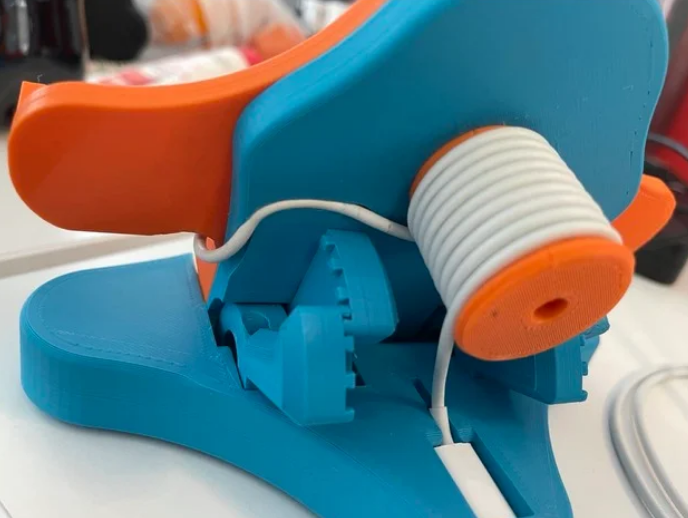
Now you need to connect the threaded tube with the moving connector. It is important to put threaded tube in a right position as it can be rotated and the wire of your magsafe won’t be put ideally inside it. Consider that the wire of the magsafe should be wound starting with the bottom and closer to the moving connector. This means that thread of the threaded tube should started from the same (bottom and closer to the moving connector) side (check threaded tube position.jpg file).
Once you found right position for the threaded tube put a M3 bolt inside of it and screw it into the moving connector from the visible side of to the blind threaded insert recently fused into it.
Now you need to connect hinges with the base. We have right and left hinges. The right is the one which was assembled using hinge_moving_right. Same for left one. Put a base in front of you. The small area for usb type-c connector of mag safe should be closer to you (position like on 5.jpg). In this position of the base we can identify right and left sides for hinges – check ‘base hinges position.jpeg’ file.
Take a right hinge first and put it into the right hinge position of the base. Each hinge has a small flat area on a larger cylinder. That flat area should be parallel to the bottom of the base. Once you put hinge inside push the hinge to the left side. Then find a hole for the bolt on the bottom of the base. That bolt should connect base with hinge. Screw the M3 bolt tough through the base to the hinge. The second bolt should be put from the top – check second_bolt_position.jpg file. Push it hard when you screw it in as holes might not be aligned ideally. Repeat for the second hinge.
Now we need to connect moving connector with hinges. Put hinges into position like on the picture hinge_position_to_connect_moving_part_1.jpg. That will access screw holes like on the picture hinge_position_to_connect_moving_part_2.jpg. Screw 2 M3 bolts through hinges into the moving connector. Then find another screw hole to connect hinge with the moving connector on each hinge and screw them in. Moving connector is now connected 😊
Now put phone holder to the moving connector and screw 4 bolts into it to connect these parts.
Take 4 fisheye gums and glue it to the bottom of the base like on the picture 6.jpg.
Following steps will be differ depending on if you want to use magsafe or not.
Using magsafe charger.
The hole for magsafe is too tight. So, you won’t be able to put it as is. You should cut extra plastic from the top edge until you can put it there. Be careful and not cut it too much (be also careful and don’t cut yourself) as magsafe will have a lyft with the phone holder – in this case use double sided tape to glue it in. In my case it held there without tape.
After magsafe is installed in the phone holder take it’s wire and put it to the wire channel. Then put it to the wire channel on the back side of the moving connector (it should also be tight). Then wound wire around the threaded tube and put type-c connector into it’s place in the base (I’ve made tube size exactly in the way to put all wire there). If you see that too much wire remained from the usb connector part then shift it a bit along the threaded tube to leave needed amount on the usb connector side. Consider that some amount of wire is need to change tilt angle. Then adjust needed amount of wire using wire channel of the moving connector.
We are done here 😊
When you don’t want to user magsefe. But you want to cover a place holder for the magsafe. Use magsafe replacement for this. Take round magnets. Find which side you need to glue it in by putting magnets to the phone (iPhone 12 has magnets inside and we need to define which side of magnets should be used to keep magsafe replacement pinned to the phone like magsafe charger). The glue the magnets to the magsafe replacement keeping sides of the magnets correctly.
Few advises from me:
• Use thermal glue
• Take more magnets then needed as it can help in gluing. Just put 1 magnet in right position to the plastic magsafe replacement, then take few other magnet and put it on the other face side of the magsafe replacement to keep glued magnet on its place while glue is drying or cooling.
Once magsafe replacement is prepared (with magnets) try to put it to the place for the magsafe on the phone holder. The hole for magsafe is too tight. So, you won’t be able to put it as is. You should cut extra plastic from the top edge until you can put it there. Be careful and not cut it too much (be also careful and don’t cut yourself) as magsafe replacement will have a lyft with the phone holder – in this case use double sided tape to glue it in. In my case it held there without tape.
That’s it 😊
Credits:
RossTech
Download 3D models
| File | File size |
|---|---|
 Magsafe+phone+holder
|
4 MB |