
After hours of exploring every nook and cranny of Tallon IV, finding every one of the 12 artifacts, and defeating your nemesis (definitely for sure this time no doubt), you venture into the core of the Impact Crater to face off against one last foe…
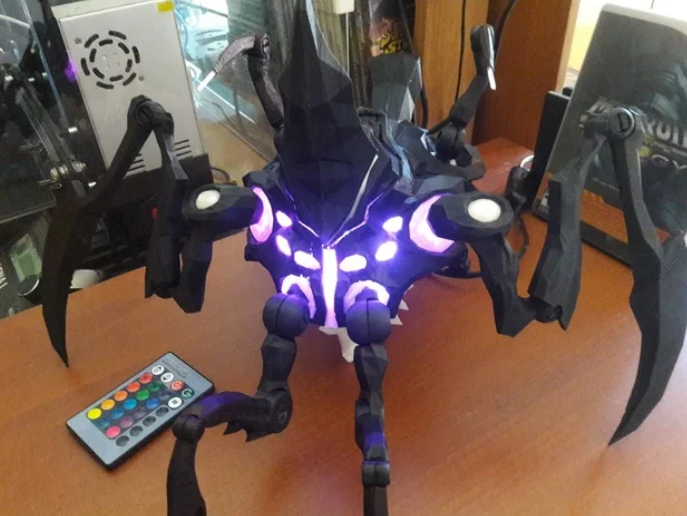
This is Metroid Prime, the final boss of… Metroid Prime. This articulated figure was made using the actual in-game model of the creature (with the help of MPR and URDE), with brand new joints added to every articulation. Most of the pieces are just as they were in-game, with some modifications done here and there.
The inside of the boss is hollowed to allow the addition of an RGB LED module inside, which represents the beam vulnerabity of the creature, this is also why some of the parts are made with translucent material, first to allow the light of the LED to escape, but also to be able to use the remote control that comes included and needs line of sight with the IR sensor.
The space inside was designed to house the electronics and the transformer of a particular 3W lamp I bought and gutted, if you are interested, just know that the size of the PCB is 32x32mm (Ø36). The back leg has its three segments also hollowed out to allow the passage of a cable to power the LED, but if you don’t want to do that stuff, I’ve also provided a version of the toe (?) without the hole.
To assemble this beast, you will need two of each part with the exception of the jaw and the lower teeth which only one of each is required, and the piece called peg_1 needs 10 of each to make the hinges, I tried having them being part of the limb but they kept breaking, forcing me to discard the whole part, so I decided to have them be their own thing, which allowed me to print them in a better orientation. The smaller pegs are for an easier assembly of the halves, you will need roughly 14 of them.
Every single part is from the left side, limbs with the number 1 are closest to the body, number 2 is the middle part, and number 3 is the extreme. “Joint” pieces are attached to their corresponding body part, and “connection” pieces link the joints to the limbs. The very last upper tooth actually prevents the mouth from being able to close itself properly, so I added an alternate version that has that last tooth removed, guess too much Phazon ingestion can cause cavities.
I’ll probably add an infograph because it can be confusing, and assembling the body can be quite tough without help. Vises and rubber bands will come in handy while gluing some of the parts together.
Your feedback is more than welcomed, as Im still looking into some of the parts.
See you next mission.
Print Settings
Printer: Hellbot Magna 1
Rafts: No
Supports: Yes
Resolution: 0.15 and 0.1
Infill: 10% and 20%
Filament_brand: Printalot
Filament_color: Black and Translucent
Filament_material: PLA
Notes:
Transparent pieces work fine with the LED either having “2mm wall and 20%” or “1mm wall and 10%”. More light passes through with the thinner pieces, but it looks smoother with the thicker ones. Choose whichever you like most.
Pegs 1 2 and 3 should be printed on their side to improve their strenght, thick walls and more infill are recommended. The smallest ones can be done vertically.
The teeth could be made with ivory or white filaments, but they kinda look like glass crystals in-game, so I just stuck with translucent.
Credits:
ddd87
Download 3D models
| File | File size |
|---|---|
 Metroid+Prime
|
14 MB |