
Of all the really cool SD/Micro SD card holders I have found on Thingiverse so far, none provide the ability to write the contents of a given micro SD card on an index, and store the card in a holder with an index marker.
Those of you who have many different devices that use micro SD cards know the problems trying to keep up with the contents of these tiny, multi-gig storage devices.
Like many of you, I have several versions of Raspberry Pi distros and backups, a bunch of Arduino stuff, photographs, drone footage, firmware updates, music, etc., and I don’t have to tell you how time consuming it can be to keep track of all this or find out what is on these with no system for indexing them.
They’re too small to write on, and the SD card adapters most of them ship with aren’t much larger, so stickers aren’t a good solution, and wrapping them in paper is just plain sloppy.
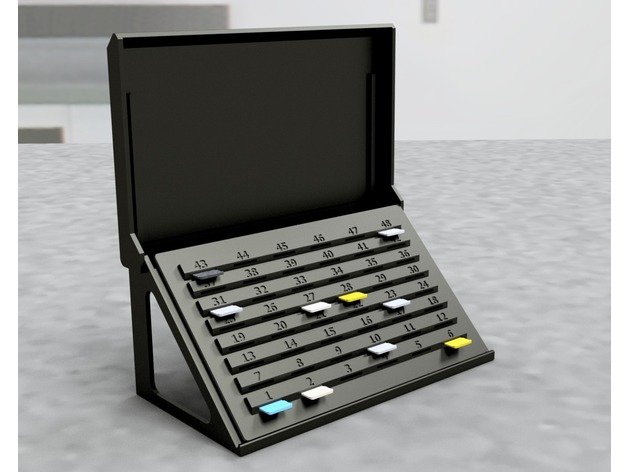
To address this, I made this micro SD card holder with indexed slots, that will hold up to 48 of these tiny things.
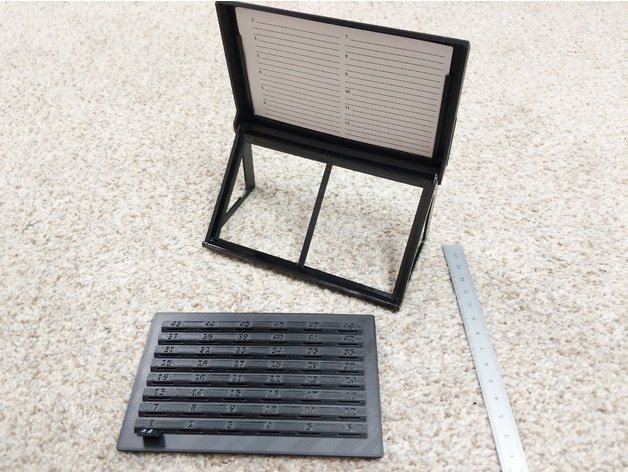
It has a stand that allows the mounting of the dust cover/lid which accepts common 3″ x 5″ index cards, for which I have included a template in Word and PDF that has plenty of room to write the contents of cards occupying two rows for each index card, so four 3 x 5’s should allow recording of the contents for all 48 micro SD’s, and all four cards may be stored in the cover.
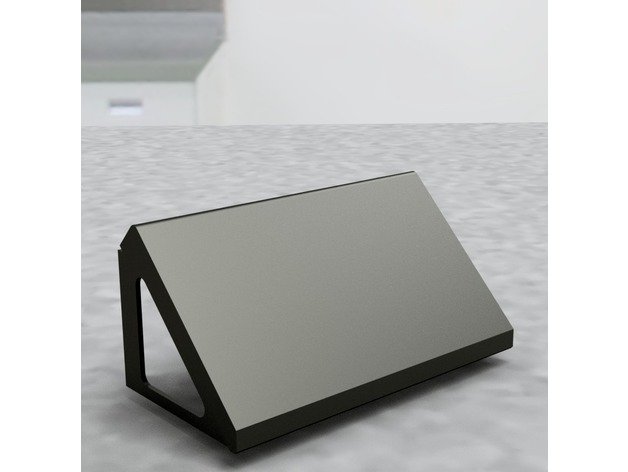
The SD card holder may be lifted out of the stand, or bonded permanently, at your option. It is designed with 45 degree angles, requiring no supports when it is printed, but you probably should use a brim for best bed adhesion as the slots have plenty of clearance, but they will not tolerate very much warpage.
If your printer is properly calibrated, the holder can be put to use with no cleaning other than removing the brim if you print with one for best bed adhesion, but I advise making certain the slots are clear before inserting cards to avoid damage to the contacts by errant bits of plastic debris.
The lid must be printed with supports for the slots that hold the index cards, and for the pivot pins that engage with the stand. Removing the support material from the slots is a minor challenge, and must be done with care and patience, but it is possible as my test prints show in the photos.
The stand is designed to be printable without supports, which is why I present it in four pieces. These have locator pins and holes to assist assembly, with dado slots in the side pieces to receive the lid support member. There is an illustration in the photos that show how these pieces fit together. Take care when removing the delicate “center” piece from your print bed, as it is quite thin and might seem rather flimsy, but the assembly becomes very rigid and sturdy when the four pieces are fully bonded together.
My dream is to (someday) create a tiny, automated storage machine powered by a Raspberry Pi that automatically keeps these, accepts input of their contents, and the spits out the desired card from a touch-screen GUI, much like a CD changer.
Until then, I hope this manual system is as useful to you as it has been for me!
Credits:
mbunds
Download 3D models
| File | File size |
|---|---|
 Micro_SD_Card_Storage_with_3__x_5__Index_holder_Dust_Cover
|
1 MB |