
How To Secure It
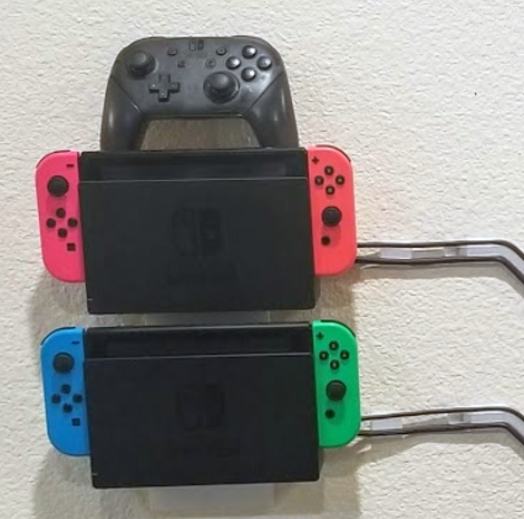
To Answer the obvious question. You secure the two halves together with a Coat Hanger. Cut it to be a little less than the upper dock portion’s width. File or clip the tip a little to round it (this prevents snagging) and turn the back down 90 degrees like an allen key to make it a pull tab.
Durability (PRINTED IN PETG!):
Tested with up to 60 pounds down and ~20-30 pounds away. I did not want to try more than that as the dock might break (instead of the mount). The PETG also gave it some good flex and the rounded corners and print orientation enabled flexing over cracking/layer separations to accommodate the stress.
Design considerations:
Cooling is NOT impeded in this mount at all. I made sure the dock mount only covers solid plastic parts and not anything with a hole. As such, none of the USB ports are blocked either. So all the cable ports, LED in the front, etc is open and visible/usable.
I also designed this to be Stack-able vertically so you can dock multiple switches in one place somewhat easily. Just leave enough space to remove the lower dock without having to take the entire upper dock mount off the wall.
Even with the cooling considerations, print it in PLA at your own risk. I made mine in PETG and tested the security of it only in PETG. Given the low profile way it holds onto the sides I would be wary of how PLA fares over time+heat from demanding games.
Assembly instructions:
Rest a level on the bottom half. and put two screws into the counter sunk holes to anchor it in place. The holes are countersunk with an 82 degree head (standard wood screws like Home Depot, Ace Hardware, Lowes, ETC will seat nicely).
Insert the switch dock into the top sleeve.
Lower it onto the wall mounted half.
Insert the Coat hanger from the right side (when facing the dock).
Have fun with it. I designed it as a bit of a challenge and mostly because I could not find a dock that worked specifically the way I wanted. I hope it helps others who were looking for other options too.
If you read this far, thanks! My first print I posted 🙂
Print Settings
Printer brand: Prusa
Printer: I3 MK3S
Rafts: Doesn’t Matter
Supports: No
Resolution: .2
Infill: above 20%
Filament_brand: Hatchbox
Filament_color: Clear
Filament_material: PETG
Notes:
Use PETG! PLA Might still work, but I took advantage of the higher flex and durability of PETG to make this low profile. Also I do not know the upper limit on the switch heating and I used PETG to avoid any sagging over time from heat.
Assembly instructions (Again):
1. Rest a level on the bottom half. and put two screws into the counter sunk holes to anchor it in place. The holes are countersunk with an 82 degree head (standard wood screws like Home Depot, Ace Hardware, Lowes, ETC will seat nicely). 2. Insert the switch dock into the top sleeve. 3. Lower it onto the wall mounted half. 4. Insert the Coat hanger from the right side (when facing the dock).
Credits:
AugHackett
Download 3D models
| File | File size |
|---|---|
 Nintendo+Switch+Angled+Stackable+Wall+Mount+for+Dock
|
743 KB |