
 sc
sc
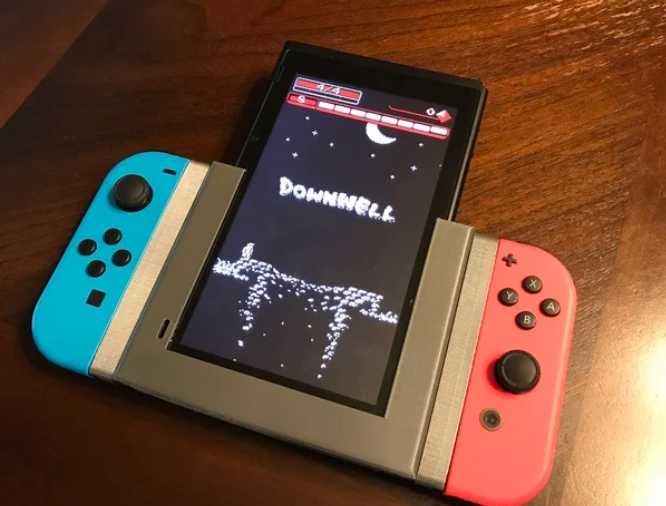
I know there are other vertical mounts for the Switch out there on Thingiverse, but I decided to make my own for the experience. I also wanted to slide the joycons in the bottom for maximum support while playing. I would not hold the switch upside down with this design. However, I really like that when in the proper playing orientation the console is very well supported.
It has cutouts for the air intake, air exhaust and front speaker. The console slides in very smoothly as well. The cutout for it matches the profile of the console very closely. The joycon mounts also match the profile of the joycons.
I decided to design this in 3 parts that fit together with dovetail joints because when I printed test joycon mounts with the track in the vertical direction I was not happy with the resolution I was able to get on the track and did not want to have to force the joycons on and off the tracks. By printing them track-down I am able to get a very thin track for the joycon to ride on. I was really happy with how smoothly the joycons slide into the mounts I printed. If you pull them down they will side off without pressing the release button, but I think that is due to the shape of the locking mechanism on the joycon. I would be curious to see how well these would hold if remixed to slide in vertically. However, I was more comfortable with them holding the console well being slid in from the bottom.
I decided to print the screen mount vertically so that I would not need to use supports.
Print Settings
Printer brand: Creality
Printer: Ender 3
Rafts: Yes
Supports: No
Resolution: 0.2
Infill: 20%
Filament_brand: Zyltech
Filament_color: Metalic Silver
Filament_material: PETG
Notes:
I used a tiny bit of support on the screen mount just around the curved edge at the bottom, but it was probably unnecessary. I did not use any support on any of the cutouts or overhangs. They all bridged fine on my stock Ender 3 Pro with PETG. The orientation I printed the parts in is the same orientation they show up in in the STL: – Print the screen mount vertically. – Print the joycon mounts with the track the joycon rides on down against the build plate. This allows the precision of the Z axis to provide a thin and smooth track for the joycons to ride on. This does mean bridging over the track, but I had no issues with it. I used rafts for all three parts. I think it would be very difficult to print the joycon mounts in the suggested orientation without rafts. The screen mount may print without a raft, but with a 7+ hour print that is 100mm tall I didn’t want to chance it getting shaken loose. I did several small test prints of just the tip of the joycon mount, and then just the top of the screen mount to make sure everything fit well. UPDATE: I would suggest doing test prints of pieces of the dovetail joints to make sure you are happy with how they fit. Mine fit nice and tightly. However I did notice a small hairline crack along the layer lines on the top left hand side of my screen mount when using it. I had to push pretty hard to overcome some resistance to lock in the joycon mount in on that side, which may have caused the tiny crack. I probably should have stopped and filed it down a bit where I felt the resistance.
How I Designed This
General Design Notes
This is my first 3d model. I am a software developer so OpenSCAD was a natural choice for my first design. It also worked well for the precision of this design. I measured my Nintendo Switch console with a cheap Harbor Freight digital caliper and used those measurements to build the model in OpenSCAD. For measuring the curve radius of the edges I did the following: – Took a straight-on photo of the side of a joycon and loaded in it Gimp. – I measured how may pixels long the joycon was and divided by my caliper measurements to come up with a pixels/mm number – Then I entered that pixels/mm number in the print size setting in Gimp – This allowed me to then use the circle selection tool to measure the curves and have the software report to me the diameter of the circle in mm. I did several small test prints throughout the process to make sure everything would fit well. First I printed just the tip of the joycon mount, and then just the top of the screen mount. I did catch a couple of issues while doing this so I highly recommend doing small test prints throughout the design process.
Credits:
jonkuhn
Download 3D models
| File | File size |
|---|---|
 OpenSCAD+file
|
1 MB |