
Post-Processing Difficulty: Easy (Ready to Use from Printer Without Processing)
Tools Needed: None
Introduction:
QUICK-CLIP (GEN 3) is a versatile mounting system that I designed to fit standard backpack and MOLLE straps/webbing. This is the base starter set for the system which includes everything you need to get started! This includes the following items:
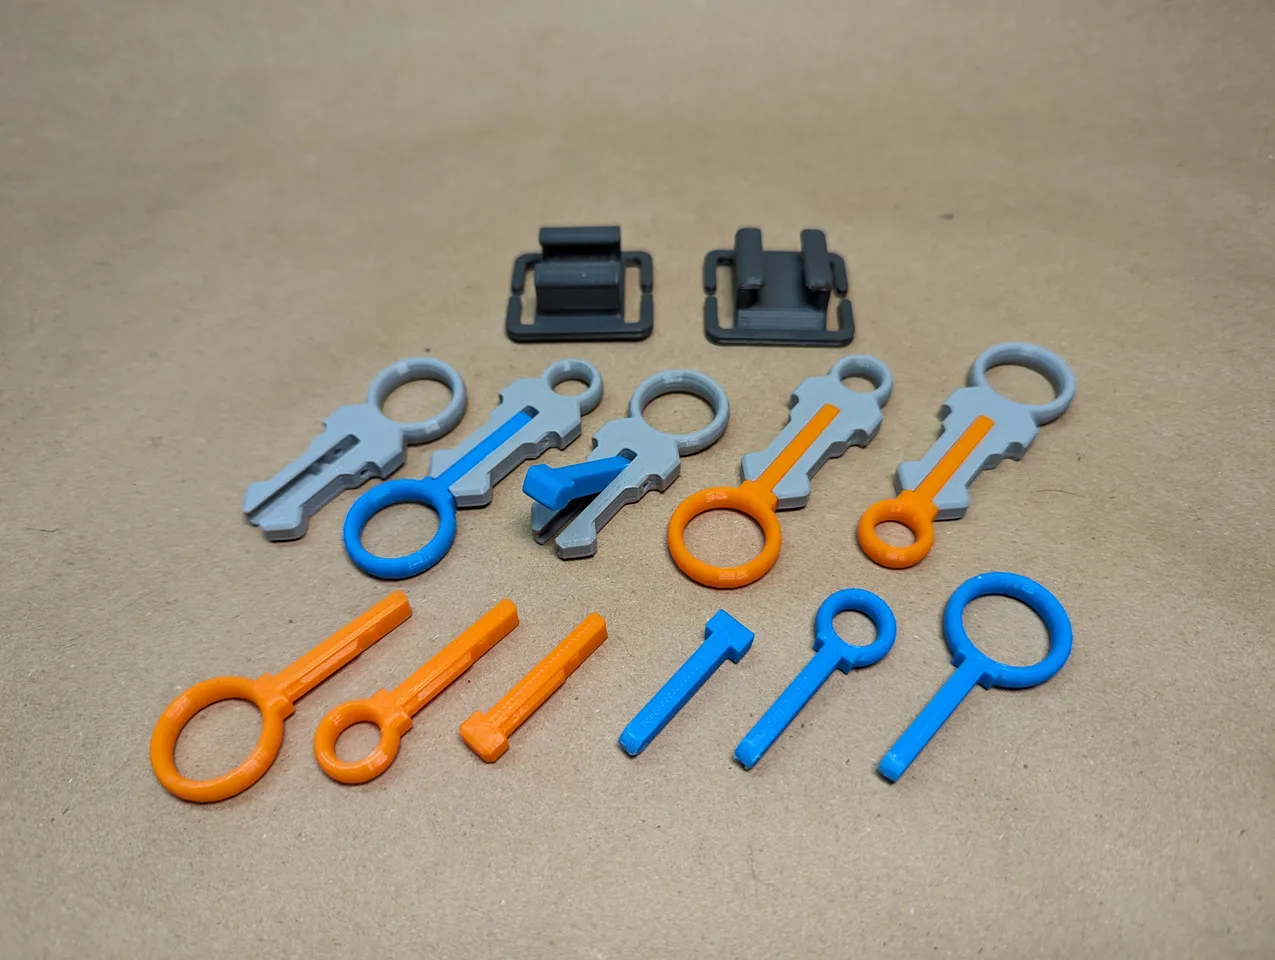
Two varieties of buckles (the dark gray pieces in the photos)
Three varieties of standard locking pins (the orange pieces in the photos)
Three varieties of captured locking pins (the blue pieces in the photos)
Two sizes of keychain / rope loop modules (the light gray pieces in the photos)
One blank module clip template (not pictured) for remixes with your designs.
All of these starter pieces are designed to be printed without supports and without brims – this means they are all ready to go hot off the printer! Other modules will be released to my profile as time goes on, so be sure to check them out! You can allow follow my account to be notified when they are released.
Parts and Instructions:
Buckles:
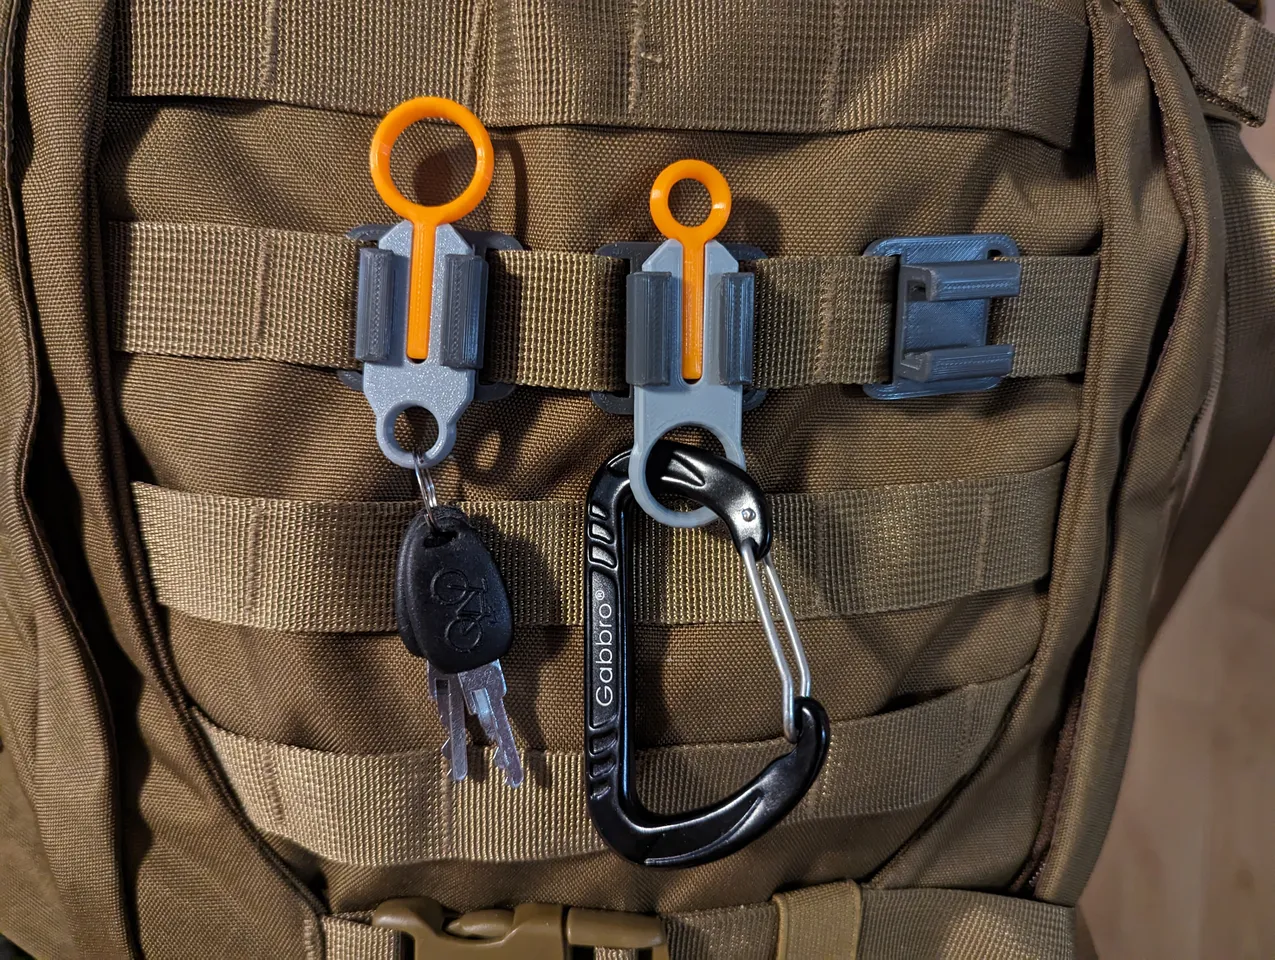
This system works by weaving your backpack or MOLLE straps/webbing through the slots in the base buckle pieces (examples shown in photos). There are two variations of this buckle, one for horizontal straps and one for vertical straps. These are designed to fit with standard 1-in (25mm) webbing found on most backpacks and MOLLE webbing straps. It will fit on smaller ¾-in (19mm) webbing typically found on the chest straps of backpacks, but it will have a looser fit. I printed these at a 0.16mm layer height with PLA and no supports. (These are the dark gray pieces in the photos). IMPORTANT NOTE: Your slicer will want to add supports under the buckle overhangs, but you will want to remove them for a smooth buckle – the part will print perfectly fine without them!
Module Clips:
These ‘module clips’ are designed to be affixed to various modules/designs, allowing them to attach to the QUICK-CLIP system. I encourage you to remix the blank module clip template with your designs to add even more functionality to them! These clips are fully ambidextrous, meaning they can be inserted into either side of the base buckle and even flipped upside down! – They also have a satisfying ‘CLICK’ when they are fully seated into the buckle. To remove the clip (without the locking pin in place), simply give a quick pull on the module/clip, and it should come out with light-moderate force, giving you rapid deployment of your modules when you need them the most! I printed these at a 0.16mm layer height with PLA with no supports. (These are the light gray pieces in the photos).
Standard Locking Pins:
These locking pins are not required for the mounting system, but add an extra level of safety, if you’re worried about your module clips falling out of the buckles (e.g. if you have your car keys attached to the outside of your hiking pack – You don’t want to lose those!). This locking pin slides in from the forked end of the module clip after it has been attached to the buckle. This pin will click into place with the use of a small internal detent and prevents the forks for bending together, which is needed to remove the modules. While the locking pin is inserted, it is impossible for the module clip to be removed from the buckle; Before the module can be removed, the pin must first be pulled out. I printed these at a 0.16mm layer height with PLA with no supports. (These are the orange pieces in the photos). There are two easily removable loop-end pins that can be removed by hand. IMPORTANT NOTE: In addition, there is now a new minimalistic locking pin, which should only be used to “permanently” lock your modules to your buckles, as they may require a pliers to remove (use case: tourniquet holsters, Kydex sheath holsters, etc. where you want the holster to remain firmly attached to your system, allowing you to retrieve your items without the holster/sheath detaching).
(NEW!) Captured Locking Pins:
These locking pins are not required for the mounting system, but add increased safety for your modules. These locking pins are permanently attached to the module clips by using a piece of standard 1.75mm filament as a hinge. Instead of completely removing the locking pin (and potentially losing it in the process!), you can now swivel the captured locking pin upward out of the way, and remove your module as you normally would otherwise. The pin now stays with the module clip so it’s available when you need it. To insert the module clip into the buckle, simply pull the locking pin upward, insert the clip into the buckle, and press the locking pin flat into place.
I printed these at a 0.16mm layer height with PLA with no supports. (These are the blue pieces in the photos).
IMPORTANT NOTE: The hinge is designed to be a very tight fit – If you need a looser tolerance, you can lightly sand the filament you will use as a hinge. It also helps to cut the end with a point to make it easier to align the holes. Once the hinge filament is inserted, use a small knife to ensure that the pin is flush with the side of the clip.
Credits:
Taylor
Download 3D models
| File | File size |
|---|---|
 quick-clip-gen-3-base-starter-kit-model_files
|
2 MB |