
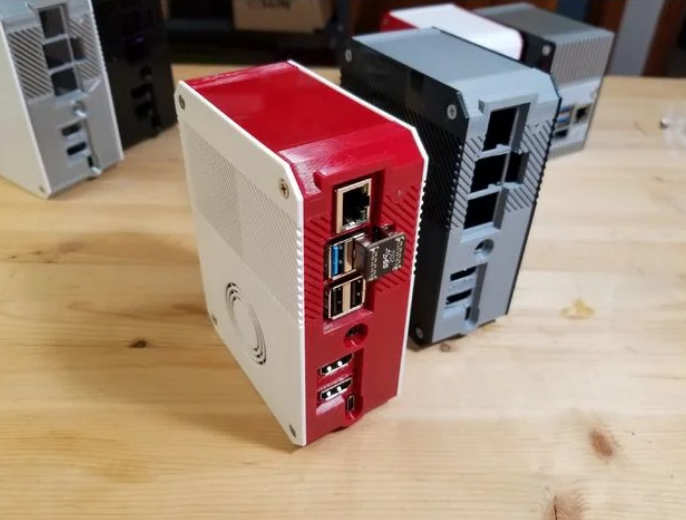
This is a case I designed for the Raspberry Pi 4.
This case only works with the X862 V2 – V1 had longer standoffs and USB jumper. And it only works with the version of the GeeekPi expansion board with vertical HDMI ports – earlier version had horizontal ports. And it only works with the low-profile Ice Tower – I have other cases for the original Ice Tower and the X862 board – check my other things.
In order to assemble this case, you must remove the fan from the low profile Ice Tower heatsink. I recommend hooking the bottom of the retaining clips with the dull edge of an x-acto knife between the fins of the heatsink, to unlatch the clips from their groove. Rather than trying to bend the top of the clips out of the hole in the fan. The fan will then be mounted on the inside of the top of the case with the mounts provided (see pics or my video about this case).
You will need a male-to-female Dupont jumper (or some kind of extension cable anyway) to connect the fan to the GPIO. I recommend running the cable below the boards for cable management reasons. There is plenty of room between the boards and the inside of the case for the cable. I was hoping that the fan could be plugged into the 5v pins on the expansion board, but that doesn’t seem to be working – not to mention it’s not the right connector for most 5v fans.
This case is designed to be assembled with the follow hardware:
12 x m3x6mm countersunk screws for the outside of the case and to attach the chassis part to the bottom of the case.
6 x m2.5x6mm screws – 3 to attach the chassis part to the bottom of the Ice Tower/Pi/X862 stack and 3 to attach the chassis to the GeeekPi Set Top Expansion Board.
2-4 m3x8mm panhead screws to attach the fan mounts to the inside of the side on the case
2-4 m3x10-14mm panhead screws to attach the fan to the fan mounts.
Some of these screws may be sourced from the various kits. There is a screw in the corner, that holds the X862 board to the standoff. Either this screw needs to be one of the flat head screws from the kit, or it needs to be left out or it will cause an interference with the screw block on the corner of the case.
All screw holes into printed parts should be tapped with an m3 tap or m2.5 tap. I used to design for screws to be screwed into the plastic – cutting their own threads – but tapping really improves the fit and finish and rebuildabilty of these cases.
There are two different “lid” parts. One with recessed for these rubber feet. One without. They’re interchangeable. Or if you intend to sit the unit on its side, you can just print two of the plain version.
I recommend printing the fan mounts on their beveled edge, so that the screw holes are all printed at a 45 degree angle for maximum layer strength around the screw holes. I don’t recommend using all four screws to hold the fan to the mounts or the mounts to the case lid. I recommend using 2 screws of each type, in a diagonal opposed manner to prevent distortion of the top when the screws are tightened all the way. See pics or video where I explain this.
The only place this should require support is around the ports and the SD card slot.
There is a USB port on the Set Top Expansion Board that would face the same direction as the SD card slot. I wish this worked as a USB2 slot for a controller dongle. But I’m 99% sure that it does not work that way. I hoped that maybe it would work that way through data channels in the USB C power connector, but I don’t think that works on the Pi 4. Anyway if you want a hole in that side to use that USB port for charging, let me know and I can make that revision.
I can also make a revision to eliminate the SD card slot and associated divot, since the X862 board allows booting from the m.2 drive with no SD card in the slot. I am hoping that at some point it might be possible to use the SD card slot as a data card, but that does not appear to be working at this time. But if you insert an SD card, it will boot from that before the USB, so I left the slot open on the case.
On a 2ghz overclocked Pi4, this case maintained a stable temperature of 46 degrees over a 30 minute 4 core Stressberry test.
Credits:
JISpal01
Download 3D models
| File | File size |
|---|---|
 Raspberry+Pi+4+Slim+Set+Top+Box+-+X862+++Ice+Tower+++GeeekPi+Set+Top+Expansion+Board
|
3 MB |