
Malolo’s Raspberry Pi 3 Model B+ Case & Stands
There already is a plethora of raspberry pi cases on Thingiverse and the last thing we need is yet another one … well – I created one anyway … because I wanted to and I had a lot of fun doing it :-).
I tried to achieve the following key features:
Easy to print without support (no steep overhangs or long bridges and stuff).
Top and bottom layer printable on print surface (so I could make good use of my recently acquired awesome powder-coated/textured print sheet).
No screws or glue needed (snap fit).
Slim/compact outline.
Acceptable ventilation without fan.
Good looking (very subjective – I know).
I also wanted a stand to put it on.
I tested this design with 0.2mm and 0.1mm layer height. Both work well. I would recommend to use PETG for better heat resistance.
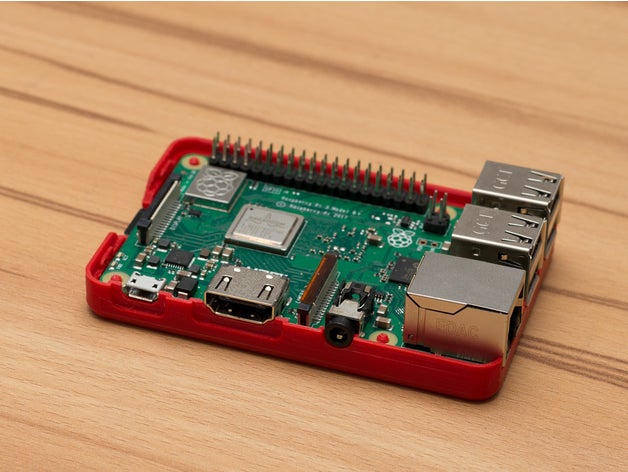
I tested this for the Raspberry Pi 3 Model B+. It may work for models with similar layout as well but since this is the only one I own I can’t verify this.
A version for the Raspberry Pi 4 Model B will come soon.
If you have any questions, suggestions or requests don’t hesitate to let me know.
Designs
There are several different designs for top and bottom
Bottom
Base design without ventilation holes
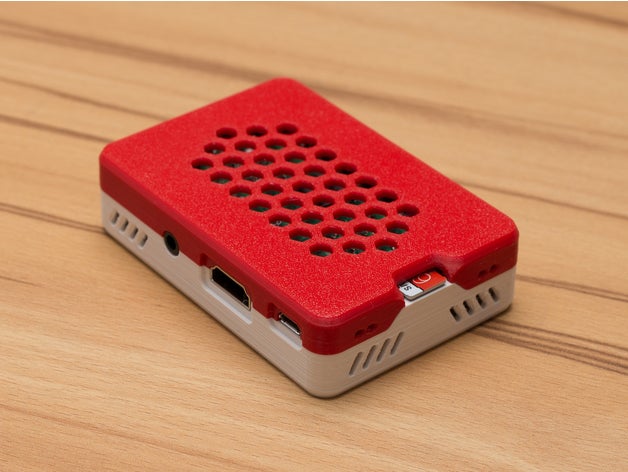
Hexagonally shaped ventilation holes
Simple slot shaped ventilation slots
Top
Base design without ventilation holes
Hexagonally shaped ventilation holes
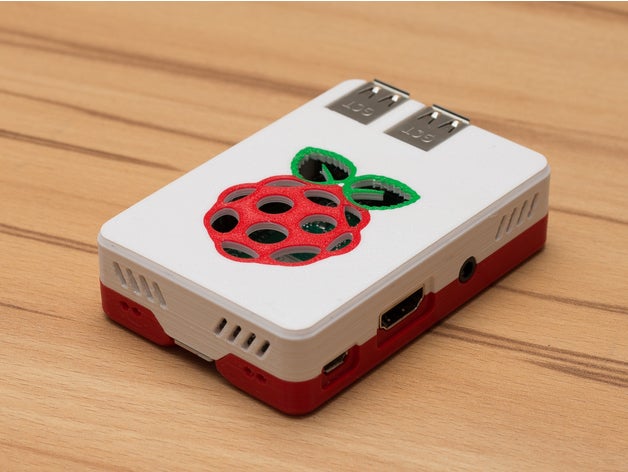
Raspberry logo as ventilation holes
Simple slot shaped ventilation slots
Stands
There are three different stands
Vertical stand
Horizontal stand
Flat stand
The vertical one also has a version that routs the Rasberry Pi status leds to the front. To achieve this you have to print the file “Stand_Vertical_LED_Guide.stl” twice using a transparent filament and slide it into the according holes of file “Stand_Vertical_LED.stl”. It’s difficult to explain – just have a look at the pictures.
Multi-Color printing
I don’t have a multi material printer but learned that you can create a multi material print pretty easily without special hardware (as long as the multi material part does not span over to may layers – otherwise it gets a pita). By multi material I don’t mean switching filament at certain layers (which would not have worked in my case because I wanted the top and bottom layers to be on the print surface) but a true multi color print (as seen in the pictures). Here is a short instruction of how it works:
I used Prusa Slicer for this but I guess it would work with the original Slic3r in a similar way
Setting up Prusa Slicer
In Prusa Slicer go to the “Printer Settings” tab.
In the “Printer Settings” tab go to “General” settings.
Under “Capabilities” increase the number of extruders to the number of colors you want to print.
For each extruder you will get an entry on the settings list on the left (“Extruder1”, “Extruder2”, “Extruder3”, …).
I would recommend to change the “Extruder Color” under “Preview” in the extruder settings for each extruder. This is not important but it will give you a better preview of the result making life a bit easier.
In the “Custom G-code” settings add “M600” to the “Tool change G-code” (M600 is the G-code command for a manual filament change).
Setting up you print
The versions of the case that are intended for multi color printing have each color in a separate STL file.
On the “Plater” tab click the “Add” button and select the STL files for all colors at once (“at once” is important here).
When more than one extruder is configured and you add more than one file at once Prusa Slicer will ask you “Multiple objects were loaded for a multi-material printer. Instead of considering them as multiple objects, should I consider these files to represent a single object having multiple parts?”. Answer “yes” to this.
Check the preview to make sure the colors are what you want. If the colors are not correct you can change them by assigning another extruder in the STL file list on the right (second column).
Hit “Slice now” an transfer the G-code to your printer.
Printing
Whenever your printer reaches the M600 command it will pause outside the print area and prompt you to switch filament (supposedly your printer supports the M600 G-code command).
Some Tips
The order in which filaments are changed is not consistent. I got around this problem by adding the M600 command to the custom Tool change G-code setting as follows “M600 ; Switch to Extruder [next_extruder]”. “[next_extruder]” is a placeholder that will be replaced during slicing. I then exported and opened the G-code file in a text editor and searched for the M600 command. I then created a checklist for each filament change to keep track of which filament has to be inserted next. Please keep in mind that extruder numbers in the G-code file are zero based. This means that extruder 0 in the G-code file is actually “Extruder1” in the Prusa Slicer UI.
When using the Original Prusa i3 MK3 the printer will extrude quite a bit of filament right after you confirm completion of the filament change to build up nozzle pressure. To avoid this extruded filament to be be dragged over to your print and make a mess don’t remove the filament that is extruded during the filament change, so it will be easier to grab the whole thing. Before confirming completion of the filament change get ready to pull the filament waste away when the print head starts moving.
This all probably sounds more complicated then it is. Once you understood how it works it’s actually pretty straight forward.
Naming scheme for STL files
There are quite a few different versions of STL files. There are different designs and for each design there are different options with regards to slots for camera and display cables and an access slot to the pins. To help you pick the right files I used the following naming scheme:
Function
Bottom = bottom part
Top = top part
Designs
Base = base design without ventilation holes
Hex = hexagonally shaped ventilation holes
Logo = raspberry logo as ventilation holes
Slots = simple slot shaped ventilation slots
Multi Material
SM = single material
MM = multi material (X = number of different colors)
Accessories
Cam = contains a slot for camera cable
Disp = contains a slot for display cable
Pins = contains a slot for access to the pins
If you are unsure which file to pick just open it in your slicer and see what it looks like.
Print Settings
Printer Brand: Prusa
Printer: i3 MK3
Rafts: No
Supports: No
Resolution: 0.1mm
Infill: 15%
Filament: DAS FILAMENT PETG
Credits:
Malolo
Download 3D models
| File | File size |
|---|---|
 snap fit Raspberry Pi 3 Model B
|
8 MB |