
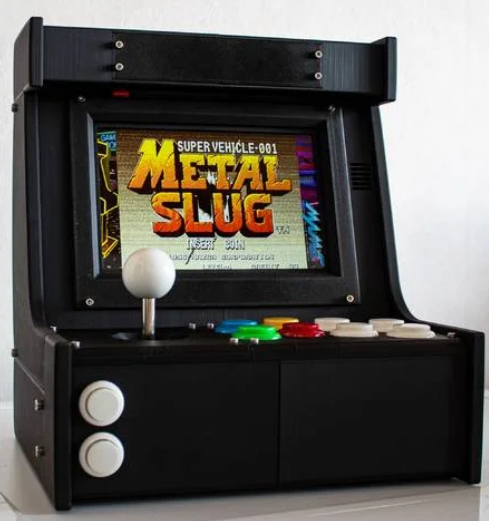
This is a Tabletop Arcade Machine based on the Dell Venue 8 Pro 5830 Tablet. It is designed around the build volume limitations of the Creality Ender 3 and similarly sized printers like the Prusa i3. It consists of 17 Parts in total. The parts are held together using screws and threaded inserts.
Print Settings
Printer brand: Creality
Printer: Ender 5
Rafts: Doesn’t Matter
Supports: Yes
Resolution: 0.4×0.2mm (you may be able to go coarser to speed up the print)
Infill: Cura Gyroid 20%
Filament_brand: DAS FILAMENT
Filament_color: Black / Red
Filament_material: 15 PLA Parts, 1 PETG Part, 1 TPU Part
Notes:
Most of the parts can be printed using regular PLA. However, two parts require a special treatment. The Tablet Holder should be printed out of something a little more temperature resistant, as it will be in direct contant with the tablet, which tends to get quite warm. This could cause PLA to warp, so I recommend using PETG here, as it’s fairly easy to print with. It also offers better layer adhesion, which really helps the Tablet Holder. The Screen Rim should be printed out of TPU (or a similarly soft material), as it will be in direct contact with the front of the tablet. Using harder materials may scratch the tablet or outright crack the screen. If you can’t print it out of a soft material, assemble it without this part. You may want to increase the thickness of the Rim in your slicer to ensure a light pressure against the front of the tablet when installed. I recommend printing this part after most of the assembly is done, as it will need to be fine tuned. I increased the thickness to 1.5mm on mine. The bottom parts have small indents for rubber feet with 10mm Diameter. I suggest you add these rubber feet after printing to prevent the cabinet from sliding around later on. I would also recommend printing the power button in a different color than the rest of the cabinet, as it would be pretty hard to see otherwise. I used the Red Filament I’ve also used for printing the Tablet Mount.
Parts List & Cost Estimation
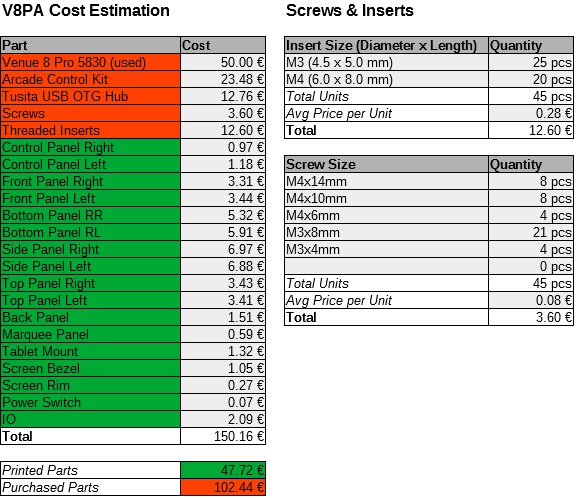
Price for a used Venue 8 Pro may vary depending on the country you live in. They are generally pretty cheap though. The specific USB Hub may also not be available everywhere, although it seems fairly generic. I’ve included the Fusion Files if you want to modify this design to work with another Hub or Tablet. The Arcade Control Kit mentioned here consisted of a single Sanwa Style Joystick, 8 30mm Sanwa style Buttons and 2 24mm Sanwa style Buttons. Not geniune Sanwa parts obviously. It also included a small PCB that is used to connect the Joystick and Buttons via USB.
Tablet Setup
Since the Dell Venue 8 Pro is an x86 based Windows Tablet, you can simply install a regular copy of Windows 10. It does however have a strange quirk, which likely contributes to its low price. Due to a Software limitation in the UEFI Firmware, this tablet cannot boot a 64-bit operating system, so you’re stuck with 32-bit even though the CPU supports 64-bit. Due to the limited amount of RAM, I recommend changing the Windows Shell from explorer.exe to your emulator frontend of choice. I personally use RetroArch on mine. You can do this by changing the following Key in the Windows Registry: HKEY_LOCAL_MACHINE\SOFTWARE\Microsoft\Windows NT\CurrentVersion\Winlogon\Shell The same Key also exists in HKEY_CURRENT_USER if you want to change this for a specific user only. This allows you to have a separate user for performing maintenance tasks. In the case of RetroArch, you may want to add some custom borders to make it look nicer. Since this tablet has a very unusual resolution of 1280×800, you likely won’t find any premade borders that fit just right. Because of this, I created some RetroArch borders using a bunch of pictures that I found on Google Images. The Console borders are designed with integer scaling in mind, the MAME borders without. You can download them here: https://cloud.rfx.space/s/Md98cQorg8Jy9wH The suggested Hub is a Tusita OTG Hub which allows for charging while using USB OTG. Not all devices support this. If you intend to modify this design to work with another tablet, you may want to check this beforehand. Additionally, the Hub has a physical switch present on it with the options “OTG” and “Charge”. If the Hub is set to Charge, the USB Devices will only work if a charger is plugged in. If it’s set to “OTG”, the USB devices will only work if no charger is plugged in. Keep this in mind if you intend to use it on battery power, as the controls of this Arcade are connected via USB. Lastly, you may want to use HackBGRT to change the Windows Boot logo, because a sideways Dell logo just doesn’t look all that pretty. You can simply use a rotated graphic there, which will make it appear in the correct orientation as the tablet is booting.
Assembly
Required Tools
– Soldering Iron (for threaded inserts) – Appropriate Screwdrivers or Allen Keys – Hot Glue Gun (or Epoxy)
Threaded Inserts
Once you have all the parts printed, you should start by inserting the threaded inserts into the parts. The holes for threaded inserts can be identified by the fact that they don’t go all the way through the part. There is one exception to this however, which is on the Side Panel parts. The upper holes for the screen Bezel go all the way through the part, so be careful not to push the threaded insert too far. All of the inserts are either M3 or M4, which should be easily identifiable by the size of the hole.
The Controller
Once you’ve put the threaded inserts into your parts, I suggest you start to put your Arcade Controls into the designated parts. To assemble the Joystick, you will need some M4 Washers along with the M4x6mm screws. The Joystick will be mounted from the bottom of the Left Control Panel part, with 2 Washers to space it from the Control Panel Part. This is to make room for the dust cover of the joystick to slide around. I also suggest adding some washers between the screw head and the joystick, as these joysticks are usually designed for larger screws than this. Ensure you place the Dust cover on the joystick before mounting on the Left Control Panel part. Check if the joystick moves freely after assembly. If not, add more washers (you can also 3D Print some spacers, they are very easy to model). Next, you can insert the buttons into the Right Control Panel part. This should be pretty self explanatory. It uses eight 30mm Sanwa style buttons. They are simply pushed in from the top, after which they will snap into place. The same thing needs to be done on the Front Panel Left part. You will need two 24mm Sanwa style buttons for this part.
The Cabinet
To assemble the cabinet, I suggest you start by connecting the Bottom Panel parts to the Front Panel parts using M4x8mm Screws. Next, connect the Side Panels to both of your assembled pieces using M4x14mm Screws. You should now have two “halves”. To connect them together, use M3x8mm screws to install the Tablet Mount. This will hold both halves together, but be careful when handling it, as it won’t be terribly stable like this. To further stabilize it, you will need to mount the Control Panel. Put the Arcade Control PCB into the bottom of the Cabinet and start connecting your buttons to it. The exact way they are wired up depends on the specific board you have. You can optionally hold the PCB in place with some hot glue, although I’ve left mine just loosely laying in there. The cabinet won’t be moved during operation anyways. Once all of your buttons and the joystick are connected, attach the control panel parts using M3x8mm Screws. Make sure you don’t squish any cables when installing the control panel. The cabinet should now be much more stable. Next, you’ll need to assemble the Rear IO Panel. If you can’t get the exact Tusita Hub that I’ve used, you may need to modify the part. I’ve included the Fusion file to make this as easy as possible. With my design, I’ve just attached the ports of the hub to the Rear IO using very generous amount of hot glue. It’s not pretty, but the Hot Glue won’t be visible from the outside anyways. Once the hub is attached, you can attach the Back Panel to the Cabinet using M3x8mm Screws. This will further stabilize the cabinet. Afterwards, you should be able to slide the IO Panel including the Hub into the back panel and attach it using M4x10mm Screws. Make sure the Micro USB Lead sticks out the top so you can connect it to the tablet later on. Also, this is a good time to connect the Arcade Control PCB to the USB Hub. Now is a good time to test if everything works. Insert the Venue 8 Pro into the tablet mount and connect the Hub via Micro USB. Switch the Tablet on and see if your controller is recognized. Troubleshoot and fix any issues that come up and proceed once everything works. It would now make sense to install the Screen Bezel and Screen Rim. To make assembly easier, you can use a small amount of hot glue on the corners of the rim to hold it in place during assembly. Only use very little hot glue here though, as it’s purely for assembly, and you don’t want any of it visible from the outside. If you can’t print TPU, you should skip the Rim altogether, it’s just for locking the tablet in place a bit tighter. The Rim should not cover any part of the screen. You can now install the Screen Bezel + Rim using M3x4mm Screws. Now the only thing missing are the top pieces. Insert the power Button into the slot so it makes contact with the power button of the tablet and insert the Top Panels. The tolerances might be a bit tight at this point, so you may have to install both Top Panels together and hold them down while inserting the M4x14mm screws. Make sure the power button is lined up with the slot in the Top Panel Left part. You can now install the Marquee Panel using M3x8mm Screws, which should stabilize the top. You should now have a fully assembled Tabletop Arcade Cabinet. If you need to access the internals again for maintenance, you can remove the Screen Bezel or Back Panel for easy access to the Tablet or Hub. The Control Panel can also easily be removed to replace faulty switches.
Credits:
RFX01
Download 3D models
| File | File size |
|---|---|
 Venue+8+Pro+Tabletop+Arcade
|
2 MB |