

This model is a continuation of my Desktop Mini Tool Box project.
There are multiple variations I have created for your favorite drawer configuration.
Current configurations:
4 Drawer (2 full, 2 half size)
Upcoming configurations:
2 Drawer (full size)
3 Drawer (full size)
5 Drawer (1 full 4 half size)
6 Drawer (6 half size)
This model features a hinged lid that functions like the real thing with locking arms to keep it open, and a twist locking latch to keep it closed… when closed.
Printed Parts:
1x Top Cabinet
1x Top Cover Panel
1x Front Cover Panel
2x Full Drawers
2x Half Drawers
2 Full Drawer Handle Covers
2x Half Drawer Handle Covers
1x Latch Knob
1x Latch Pin
Printed Parts for locking hinges:
4x Hinge Pin Single
2x Hinge Pin Double
1x Top Hinge LEFT
1x Top Hinge RIGHT
1x Bottom Hinge LEFT
1x Bottom Hinge RIGHT
Due to the dimensions of the original bottom cabinet and wanting this one to match, I was limited with the depth which affects the size of the front covering panel. This does cause it to slide into the top parts tray when opening, and items placed in it may hinder the panel from moving if you want to open or close it (minor detail).
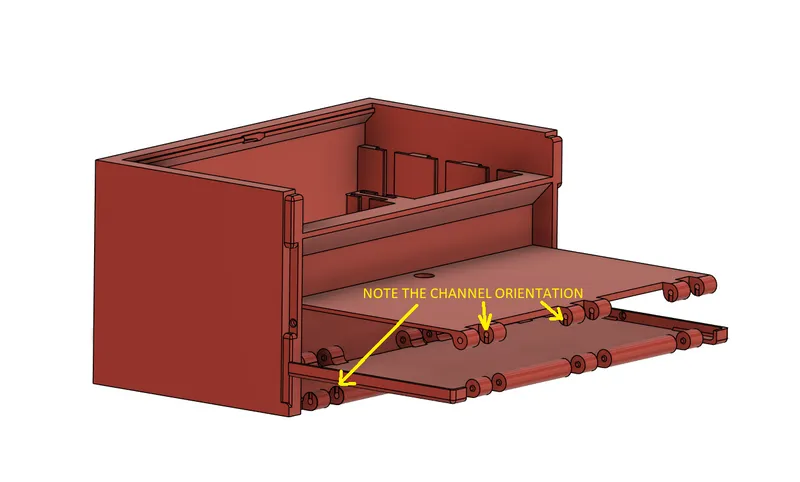
FIGURE 1
When assembling the lid there are small channels embedded in the hinges to aid in assembly so the lid snaps together easier (FIGURE 1). Shown above are how the cover panels need to be oriented when pressing them together. Lay the cabinet on it’s back and press the hinges together as shown above. There should be some resistance but should snap into place and fold easily once put together.
FIGURE 2
The latch mechanism is straight forward, each part has a pie shaped groove that help align the parts when gluing them together. Apply some glue to one side and sandwich them through the hole in the front cover.
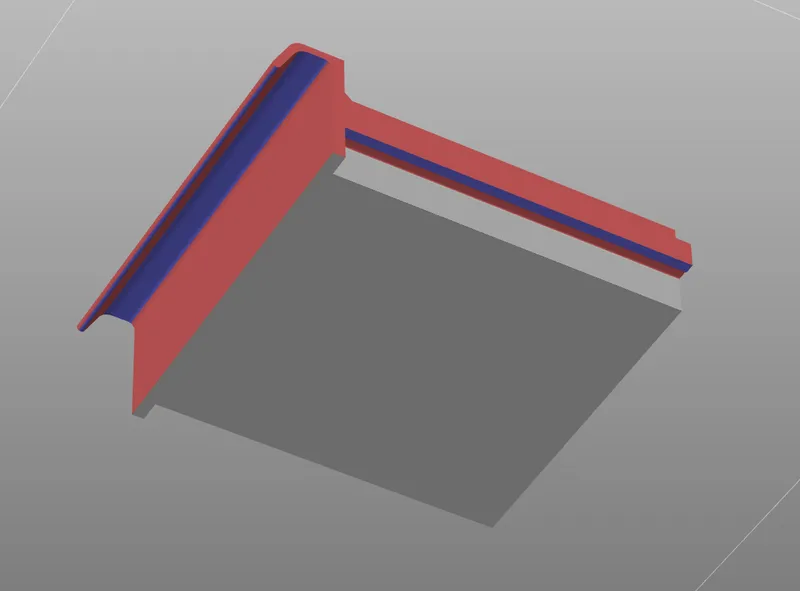
FIGURE 3
A number of people reached out having issues with supports and printing the drawers on the original project. Figure 3 shows where to paint on ORGANIC supports in blue, and avoided in red. Note on the drawer slides that only the outer part of the slide will have supports, as once the print progresses the actual part that contacts the cabinet will be support free. This helps avoid any residual support from inhibiting the drawer from sliding in and supports bend off very easily. When painting the supports, I used 35 degrees as my enforcement angle and enabled smart fill with “overhangs only”.
Optional Detail:
The locking arm parts are SMALL and can get lost easily, so watch out when assembling it! When assembling these, PLEASE PAY ATTENTION TO THE ORIENTATION OF THE PARTS WHEN ASSEMBLING THE LOCKING ARMS OTHERWISE THE LID WILL HAVE DIFFICULTY CLOSING AS THE PINS WILL BIND AGAINST EACH OTHER!
The heads of the pins need to be inserted so they sit FLUSH in the countersunk holes. These are TINY parts and may require a quick inspection and cleaning scrape of the hole with a knife to ensure there is enough of a countersunk area for the head to slide into. I found that to assemble the hinges, placing the pins on a fat surface and pressing the hinges onto them was much easier than trying to push the pins into the hinges by hand.
Below (FIGURE 4) is pictured the way the right side hinge needs to be assembled. Only the single pins need to be glued into the lid and cabinet, take care not to glue the pin to the hinge itself! Mirror this assembly for the left side.
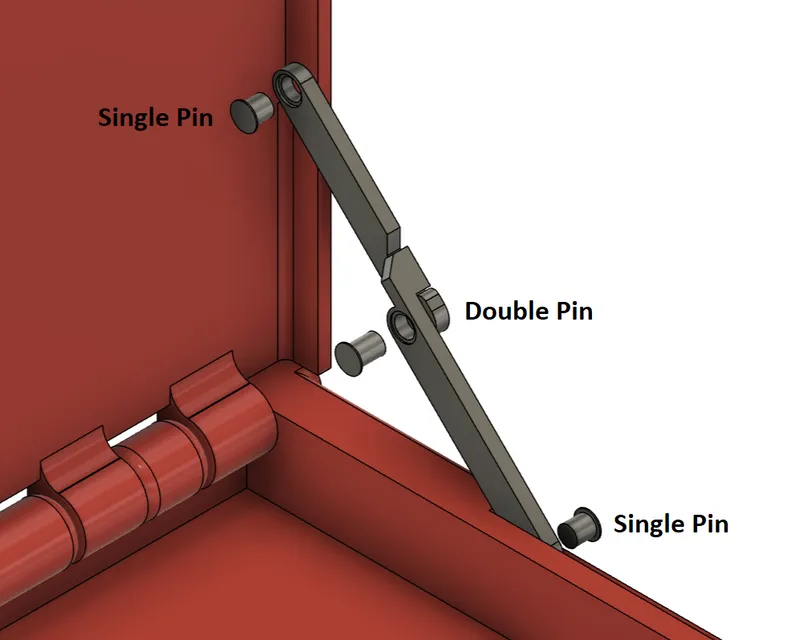
FIGURE 4
I tried to take feedback from the original project to improve on this one. Notable improvements include:
Drawer dimensions were improved and my printed versions slid very easily into the cabinet.
Drawer handle covers are changed for easier printing.
This project was printed in PLA which I found worked much better than PETG that I used on the bottom cabinet.
Layer height 0.2mm with 0.4 nozzle
Infill 7% Cubic
No supports needed except for the drawer handles and slides (again, use organic tree supports, grid will fail!)
I appreciate the support I received from the original project, I hope everyone can enjoy this one as well!
If you would like to sell physical copies, consider joining the commercial club tier to sell even my free public designs! I would like to continue making models free for personal use, but also provide an option for those who would like to legally sell prints of my work.
Credits:
DiTech Fabrications
Download 3D models
| File | File size |
|---|---|
 desktop-mini-toolbox-top-cabinet-4-drawer-edition-model_files
|
1 MB |