
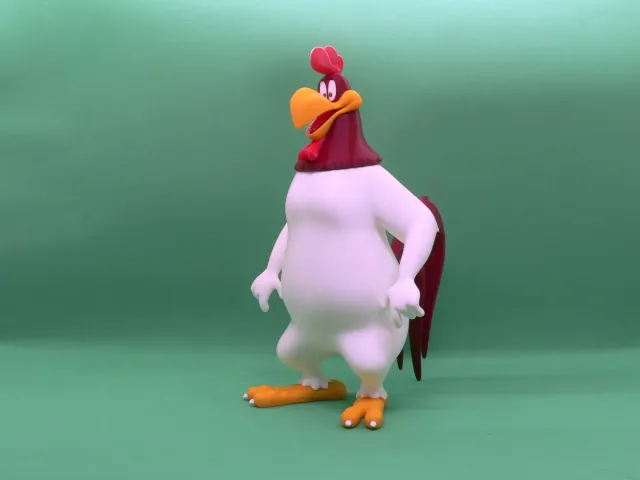
Foghorn Leghorn, a cartoon character in the Looney Tunes and Merrie Melodies series of short films produced by Warner Bros.
Physically, he is a very large rooster with a Southern accent and is easily the tallest of all the regular Looney Tunes characters. He has a bombastic and somewhat unrefined personality, and shows a penchant for mischief. His name “Foghorn” is indicative of his loudmouthed personality
No supports are required. One piece contains built-in supports. A optional part without the built-in supports is also supplied if you want to use your slicer supports (see notes below). One part is split for easier printing. An optional one-piece part is supplied as well, which would require numerous supports. If you have the proper filament colors, no painting is needed.
The assembled model is 270mm tall and is mostly in proportion to my previously released Looney Tunes models.
**Print Instructions:**
Supports: No
Resolution: .2mm
Infill: 10%
Notes:**
Refer to the notes below for a few helpful printing and assembly instructions.
**Building the model**
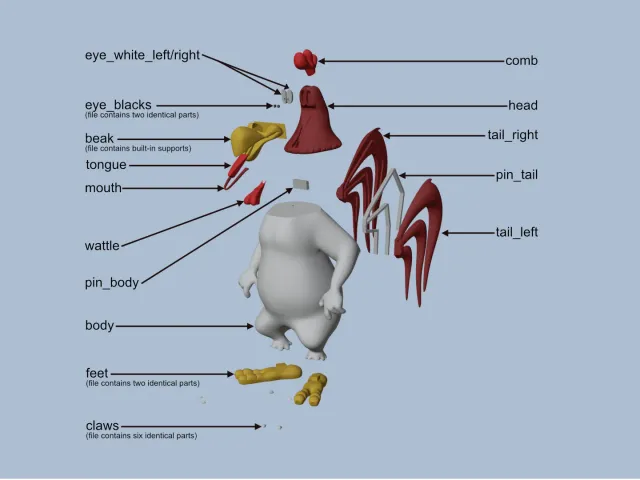
Colors
Black: (Paramount3D PLA – Black)
eye_blacks (contains two identical pieces)
..
Yellow: (Paramount3D PLA – Egg Yolk Yellow)
**My picture does not due the yellow justice**
beak
beak_without_supports (optional piece)
feet (contains two identical pieces)
..
Dark Red: (Paramount3D PLA – Iron Red)
head
mouth
tail_left
tail_right
tail_onepiece (optional piece)
..
Red: (Hatchbox PLA – True Red)
wattle
comb
tongue
..
White: (Overture PLA – White)
eye_white_left
eye_white_right
body
claws (contains six identical pieces)
..
Any color: (hidden piece):
pin_body
pin_tail
..
**Printing and assembly tips**
Printing tips
1 – No supports are required. One piece contains built-in supports, beak. An optional part without the built-in supports is also supplied if you want to use your slicer supports. The built-in supports are designed for a .4mm nozzle and for the size that the model is presented. Use your discretion for which parts to use if you resize the model significantly.
2 – The tail can be printed in two parts with a pin for alignment, (tail_left, tail_right, pin_tail). An optional tail part in one-piece is also supplied, which will require a significant amount of supports in your slicer. My posted model was printed with the split tail.
3 – There are some pieces that may need brims or rafts, use your discretion. When setting up my prints I prefer to be conservative to ensure the least chance of a print failure, especially since the base of many parts are hidden when inserted into another part.
*I used brims on:
– eye_blacks
– claws
4 – The eye_black parts and claws are very small. It would be wise to print extra copies in case you drop them.
5 – In general for all my models, when removing parts from the printer bed, it’s a **VERY** good idea to place left/right parts into separate containers to help with the assembly process. Sometimes the difference between the left and right parts is very small but it is still worth keeping track of them and assembling them in their proper place.
Assembly tips:
1 – Take your time gluing the model together and enjoy the process. Give some thought into which parts to glue together as groups and then gluing the groups together. Let the glue for each group set completely before combining groups.
2 – I used 3D Gloop and E6000 to put this model together. I have experimented with different glues for my models and have found that these glues are a great option for my models. Each type of glue has different pros/cons and I found that 3D Gloop was far easier to use than superglue (for me). The E6000 sticky glue allows more time to position parts and is still the best for smaller parts. 3D Gloop covers the middle ground for me and really works wonders. It leaves enough time to set, so parts can be positioned correctly and it dries fast enough to hold awkward parts without the need for taping. I used the PLA version that comes in a tube. For both glues using a smaller amount is usually better than more glue.
3 – Be sure to dry fit the beak/mouth/tongue before gluing them. Also, gluing these parts together before gluing the completed beak to the head simplifies the assembly.
4 – The eye_blacks, as small as they are, still have a top and bottom. Insert the side that was on the bed into the eye_whites. The eyes should be completed and glued to the head before attaching the beak.
5 – Refer to the assembly diagrams in the pictures section as well as the uploaded pictures for putting the model together. The model is meant to be glued.
Credits:
reddadsteve
Download 3D models
| File | File size |
|---|---|
 foghorn-leghorn-model_files
|
19 MB |