
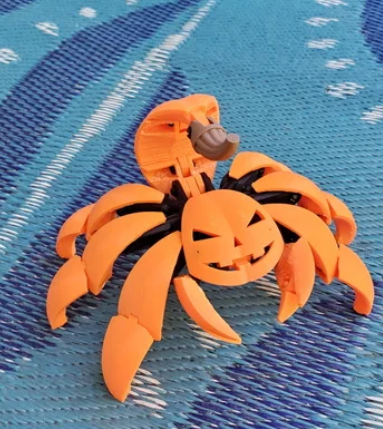
This is definitely just a harmless little Halloween jack-o-lantern. No reason to ever think it’s anything else. Don’t worry about turning your back on it.
This was inspired in part by Megawillbot’s Halloween Pumpkin Spider Transformer, though the actual design was drawn completely from scratch. I wanted to make a design that was a bit more mechanically ambitious, and then the idea of making the stem into the stinger of a scorpion struck me, and the rest of the design followed from there.
Admittedly, it’s not a very accurate scorpion. Wrong number of legs, and the legs are way too long, and the shape of the body isn’t right either. But it does make a very nice pumpkin.
There’s probably enough space behind the face plate where someone could stick in some LEDs and a battery, if you wanted to make it light up.
To assemble:
Note – this is a somewhat challenging model to assemble, with a lot of parts, and a lot of tight-fitting pins to hold the parts of the toy together. You may also have to clean up a lot of support off the oddly-shaped pieces as not much here has good flat sides.
Print the following:
24 Short Pin
6 Leg Lower
6 Leg Upper
6 Leg Inner
2 Elbow Pin
1 Long Pin
1 Body Frame Left
1 Body Frame Right
1 Body Link Front
1 Body Link Rear
1 Bottom
1 Claw Finger Left
1 Claw Finger Right
1 Claw Left
1 Claw Right
1 Face
1 Head Link
1 Stem
1 Tail 1
1 Tail 2
1 Tail 3
Assemble the three tail segments and the Stem, using three Short Pins to join them together.
Assemble the claws, making each from one Claw, one Claw Finger, and one Elbow Link. Note that the Elbow Link is not symmetrical, the shorter side goes into the claw.
Assemble six legs, each made up of one Upper, one Lower, and one Inner, joined by two Short Pins each. The Leg Inner piece is symmetrical so you don’t need to worry about orientation.
Join the Head Link to the Body Link Front with one Short Pin. Note that while the Head Link is symmetrical, the Body Link Front isn’t, and you will want to connect the Head Link to the shorter side of it.
Press the Body Link Front and the Body Link Rear into the Body Frame Right part as shown. Make sure the parts are orientated properly.
Connect the remaining hole on the Body Frame Right onto the pin on the inside right of the Face. I find it’s best to come in from an angle and then rotate it into the final orientation as you press the pin into the hole.
Press the Body Frame Left onto the face and the two Body Link parts as shown in the diagram.
Rotate the Head Link forward into the slot on the Face and secure in place with a Short Pin.
Attach the Bottom piece to the remaining hole on the Body Link Front part with a Short Pin.
Connect the Tail to the body assembly with the Long Pin. Note that the Long Pin goes through the tail, through the Body Link Rear, and through the remaining hole on the Bottom part.
Press the two Claws into the holes on the underside front of the Face, connecting with the Elbow Pins.
Attach the legs to the body frame. Connect the front pair of legs first, then the middle pair, then the rear pair. If you try it in any other order you won’t be able to get the pins in.
Print Settings
Printer: My own custom Tesseract Delta
Rafts: Yes
Supports: Yes
Resolution: 0.1
Infill: 15%
Filament_brand: Varies
Filament_color: Orange, Black, Brown
Filament_material: PLA
Notes:
I used cheap orange PLA for most of it, and some really cheap old brown filament for the stem. For the interior linkages and pins I used black PLA+, and I do recommend using higher-strength material than basic PLA for those parts.
Credits:
Ellindsey
Download 3D models
| File | File size |
|---|---|
 Halloween+Scorpion+Pumpkin
|
5 MB |