
Hello Oculus Quest 2 fans!
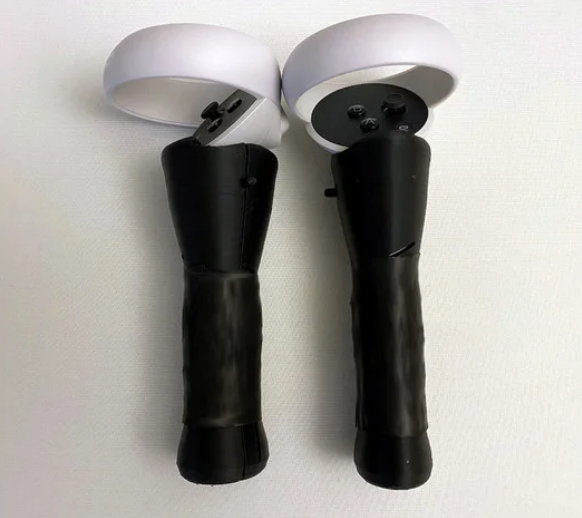
After exploring a few existing saber handle designs for Oculus Quest 2, I decided to design my own. I not only wanted a solid, comfortable handle for playing Beat Saber & other games, but I was also interested in adding accessibility features that would allow me to optionally add hand straps, wrist straps, and button/joystick extenders.
Why you may ask? Well, I not only designed these handles for me… I designed them so that my 17 yr old nephew could also enjoy the Oculus Quest 2! In May 2020 he was in a diving accident which seriously injured his spinal cord. He is unable to walk or stand without assistance and he has limited function of his hands/fingers. However, he can move his arms and wrists! Fortunately, with these controller adaptations, there are MANY games (including Beat Saber) that he has been able to play and enjoy! The dual hand & wrist straps secure the controller handles without requiring the user’s grip. Also, the optional top button panel extends the joystick and 3 buttons (A/B/Oculus) so they can be accessed/pressed without use of fingers/thumb.
This design can be utilized/customized many ways. Comfortably use original rope controller strap with these handles (via pass-through hole) or add optional velcro hand straps. I expect most users will only use the handles & side button (without velcro straps or top button/joystick extenders). These handles feel solid & comfortable, especially with tennis handle tape. When I transitioned back to original Quest 2 controllers to play Beat Saber, the difference was remarkable! The original controllers felt loose and slippery compared to using these grip handles.
STL files (basic):
-oculus-2-handle-10-top-right.stl … This is the top half of right controller.
-oculus-2-handle-10-bottom-right.stl … This is the bottom half of right controller.
-side-button-2.stl … This is the small button extender for the controller side button (left/right).
NOTES:
-Use mirror feature (available in Cura) to reverse right controller parts when creating parts for left controller.
-Be sure to review recommended printer settings to ensure strong parts.
-Secure top/bottom controller parts using strong tape and Tennis handle wrap.
-OPTIONAL: Use 3/4″ velcro (or similar) to add hand & wrist straps to controller
Optional STL files (additional accessibility to extend top buttons and joystick):
-joystick-full-2.stl … This is joystick extender to allow use of joystick by other hand.
-top-button-panel-2.stl … This is top button panel overlay which is held in place by top handle.
-top-button-1.stl … This is button extender for A, B, and Oculus buttons
I would love to hear from other users!
I especially hope the accessibility features help those with disabilities experience and enjoy the Oculus Quest 2 VR world!
Print Settings
Printer brand: Creality
Printer: Ender 3
Rafts: Yes
Supports: Yes
Resolution: .2 mm
Infill: 50%
Filament brand: Overture
Filament color: Black
Filament material: PLA
Notes:
-Use 2.4 mm wall thickness (or similar) to ensure solid/strong exterior
-Recommend wall line count of 3
-Top/bottom handle parts are printed upright (base of handle flat on printing surface)
-Use mirror feature (available in Cura) to reverse right controller parts when creating parts for left controller.
Credits:
Nelmo
Download 3D models
| File | File size |
|---|---|
 Oculus+Quest+2+Saber+Handles+++accessibility+features
|
27 MB |