
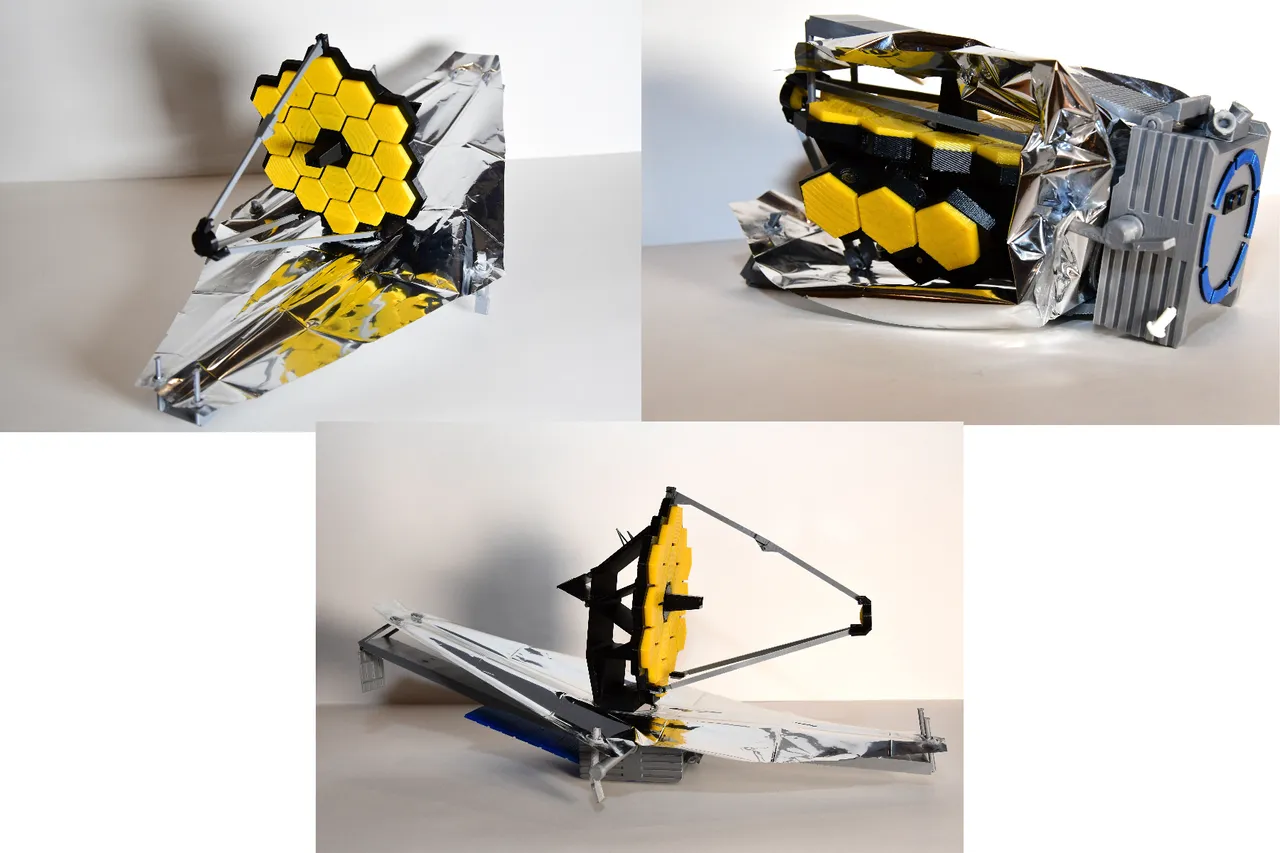
This model includes almost all of the deployment steps of the James Webb Space Telescope including:
Solar Panel
Antenna
Fore and Aft Sun Shield Pallets
Left and Right Sun Shield Boom Extension
Aft Momentum Flap
Tower Deployment
Secondary Mirror
Radiator Panel
Primary Mirror Wings
Size: Appox. 40cm, 22cm, 18cm
In addition to a 3D printer, you will need:
Small wood nails (1.25mm diameter)
Mylar Foil
Small Magnets (approx 6.3mm x 2mm)
Glue
Download build guide bellow.
Assembly Notes: (if something is not clear from the images or the notes below, send me a message and I will be happy to add a clarifying step).
The nails are used as hinges
Depending on print settings the nails may or may not fit through the holes in the 3D printed parts. I found drilling the holes out with a 1/16in drill bit worked well for the holes that were slightly too narrow.
The location of the parts and number needed (if more than 1) are included in the file names. All directions are in relation to standing behind the telescope and looking forward in the direction that the primary mirror is facing.
Parts can be held together with a small amount of glue. I recommend doing a “dry fit” before gluing any parts to make sure you assemble the model in the correct order. Some parts, such as the left and right boom arms must be assembled in the correct order.
Boom arms: insert the thicker arm into the hole on the side of the main telescope body that has the tab cutout at the top. Insert the boom with its tab entering last and push it all the way through. From the other side, insert the narrower boom arm with the tab facing down (tab end last) and pull it all the way through to the opposite side. Both arms can rotate slightly to secure them in place once in their final positions. Once both arms are inserted, stack and glue two boom washers together. Place a small amount of glue around the outside of one of the washers and insert the stack into the hole with the tab cutout on top. The first washer should be flush with the outside of the main body with the second sticking off the side (see image). Once in place, push the small boom through to the other side to prevent accidental gluing. Once the glue has dried, the booms can be slid back into place, the cap can be added to the larger end and the end posts added.
Fore and Aft Shields: the hinges must be slid onto the posts on these parts before being attached to the main body.
Many parts should not be glues as they need to move such as the tower assembly and others can be held in place with friction. Only use glue when needed.
Magnets are placed in the sockets that hold the primary mirror segments together. Make sure the magnet poles are oriented the correct way before gluing anything in place.
The hinges for the primary mirror will only work in one orientation. Check this before inserting as they are fragile and difficult to remove once connected to the back of the mirror.
Once the model is assembled, cut down the nails to be close to flush with the model for neatness and to remove the sharp points.
The Mylar foil can tear easily. To prevent this, use the sun shield washers on both sides of the foil.
To prepare the foil, gently drape a large piece onto of the model with the mirror segments removed. Use a marker to mark the locations where the 6 posts come in contact with the foil. Also roughly trace the outline of the rectangular tower hole on the foil. A bright light placed underneath the foil can help you see through it.
Glue washers onto one side of the foil. One washer should be placed centered around each of the marks that you made. The small washers go on the fore and aft sections of the shield. The larger washers go on the sides. Glue the very large Mirror Shield Washer around the rectangular tower mark but shifted forward slightly so the rectangle still fits in the circle but is not at the center. It is also helpful to shift the fore and aft washers slightly outward (1-3mm) to provide some extra slack in the shield for easier assembly.
Once the glue has dried, flip the foil over and push down around the washers so you can see the outlines. Glue a set of washers on the back of the foil, lined up with the ones on the other side.
Once the glue has dried, carefully poke holes inside each of the washers and widen the holes to fill most of the interior space. The washers should prevent tearing outside of the rings.
Place the foil onto the telescope frame, looping the washers around the posts. Insert the mirror tower and adjust as needed. Use scissors to cut the sun shield into the desired shape. For best results, cut straight lines between adjacent washers leaving some space around the outside edge of the washers.
Credits:
chemteacher628
Download 3D models
| File | File size |
|---|---|
 unfolding-james-webb-space-telescope-jwst-model_files
|
4 MB |
 instructions
|
26 MB |